
티스토리 뷰
JSP MVC model2
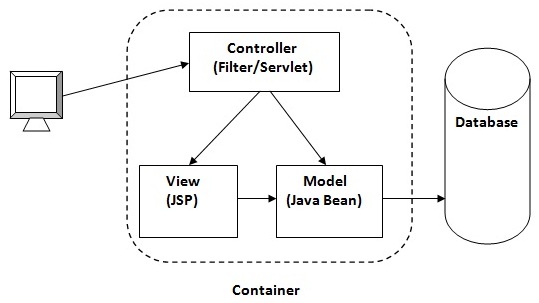
Model 2 is based on the MVC (Model View Controller) design pattern. The MVC design pattern consists of three modules model, view and controller.
Model The model represents the state (data) and business logic of the application.
View The view module is responsible to display data i.e. it represents the presentation.
Controller The controller module acts as an interface between view and model. It intercepts all the requests i.e. receives input and commands to Model / View to change accordingly.
Advantage of Model 2 (MVC) Architecture
- Navigation control is centralized Now only controller contains the logic to determine the next page.
- Easy to maintain
- Easy to extend
- Easy to test
- Better separation of concerns
Disadvantage of Model 2 (MVC) Architecture
- We need to write the controller code self. If we change the controller code, we need to recompile the class and redeploy the application.
- 모델2: 비즈니스 로직 영역과 프레젠테이션 영역이 분리되어 있는 구현 방식이다.
| 모델2 | |
| 장점 | 디자이너/개발자 분업 유리 유지보수에 유리 |
| 단점 | 설계가 어려움 개발 난이도가 높다. |
- 모델1의 방식으로 웹 서비스를 개발하는 사례는 아예 없다고 봐도 무방하다.
=============>백엔드, 프론트엔드 역할 분담이 모호해서 협업에 걸림돌이 됨
MVC model2의 형태

MVC model2는 간단하게 보면 이런 방식으로 사용된다.
Controller, Model과 View를 물리적으로 분리 시키는 것이다.
조금 더 자세한 MVC model2를 구경해보자.

Dispatcher를 집중화 하기 전 모델:
Controller서블릿이 view서블릿이 진행되기 위해서는 Dispatcher를 통해 Forwarding이 필요해진다.
Controller서블릿과 Dispatcher가 많아지고 불편해 보인다.
*참고:
forward: 현재작업한 내용을 이어갈수 있도록 무언가를 공유.
<-> redirect: 현재 작업과 전혀 상관없이 새로운 요청.
이를 보완하기 위해서 Dispatcher를 하나만 두고 여러개의 Controller 서블릿들을 사용한다.

Controller를 따로 만들고 실질적인 서블릿은 Dispatcher 하나만 둔다. 일반적인 업무 로직같은것들은 POJO클래스(일반클래스)를 디스처서블릿(Dispatcher)가 찾아서 수행하도록 한다.
이번 글에서는 Dispatch와 Forwarding이 뭔지 알아본다.
일단 코드를 통해서 보도록 하자.
spag.jsp
<%@ page language="java" contentType="text/html; charset=UTF-8"
    pageEncoding="UTF-8"%>

 <!--입력 코드--------------------------------------------------------->
<% 	int num = 0;
	String value = "";
	String num_ = request.getParameter("num");
		if(num_ != null && !num_.equals(""))
			num = Integer.parseInt(num_);
		if(num%2 != 0)
			value = "홀수";
		else
			value = "짝수";

%>
<!DOCTYPE html>
<html>
<head>
<meta charset="UTF-8">
<title>Insert title here</title>
</head>
<body>

<!--출력 코드--------------------------------------------------------->
	<%= value %> 입니다.

</body>
</html>
위의 코드에서 자바코드는 물리적으로 다른 class파일에 넣도록 한다.
spag.jsp
<%@ page language="java" contentType="text/html; charset=UTF-8"
    pageEncoding="UTF-8"%>


<!DOCTYPE html>
<html>
<head>
<meta charset="UTF-8">
<title>Insert title here</title>
</head>
<body>

<!--출력 코드--------------------------------------------------------->
<!-- request.getAttribute로 forward받은 result값을 받아온다. -->
	<%= request.getAttribute("result") %> 입니다.

</body>
</html>
spag.java
package com.newlecture.web;

import java.io.IOException;

import javax.servlet.RequestDispatcher;
import javax.servlet.ServletException;
import javax.servlet.annotation.WebServlet;
import javax.servlet.http.HttpServlet;
import javax.servlet.http.HttpServletRequest;
import javax.servlet.http.HttpServletResponse;

@WebServlet("/spag")
public class spag extends HttpServlet{

		@Override
		protected void doGet(HttpServletRequest request, HttpServletResponse response)
				throws ServletException, IOException {

			int num = 0;
			String value;
			String num_ = request.getParameter("num");
				if(num_ != null && !num_.equals(""))
					num = Integer.parseInt(num_);
				if(num%2 != 0)
					value = "홀수";
				else
					value = "짝수";
				/*request에다가 value 값을 담았다(좌측:forward받는 곳에서 쓰일 이름, 우측: 여기서 쓰는 이름*/
				request.setAttribute("value", value);

				/* forward를 위한 dispatcher */
				RequestDispatcher dispatcher
					= request.getRequestDispatcher("spag.jsp");
				dispatcher.forward(request, response);

		}

}
*참고:
pageContext: page에서 혼자 사용할 수있는 저장소
Request: forward사이에서 사용할 수있는 저장소
Session: 현재 session에서 공유될 수있는 저장소
page: 모든 session, 모든 페이지에서 공유될 수있는 저장소
Spag.java에서 실행하면 forward해서 spag.jsp(출력)를 보여준다.
모델1 -> 모델2
완전히 물리적으로 분리 되었다(두개의 서블릿으로)
spag.jsp -> spag.java(새로운 클래스) + spag.jsp(가능하면 html코드)
'Servlet JSP' 카테고리의 다른 글
| JSP EL 저장소 (0) | 2021.04.27 |
|---|---|
| JSP EL(Expression Language) (0) | 2021.04.27 |
| JSP MVC model1 (0) | 2021.04.26 |
| JSP 스파게티 Spaghetti 코드 (0) | 2021.04.26 |
| JSP로 서블릿 간단 출력 예제 (0) | 2021.04.26 |